Difference between revisions of "MK2-250"
| Line 75: | Line 75: | ||
== Firmware == | == Firmware == | ||
MK2-250 heads all use the firmware labeled "FILAMENTS_33A.hex" or "hothead.mk400.33A.hex" (these are actually the same file with different names). | With version 4 and later, all heads take the same firmware! | ||
With version 3 and earlier, MK2-250 heads all use the firmware labeled "FILAMENTS_33A.hex" or "hothead.mk400.33A.hex" (these are actually the same file with different names). | |||
== Maintenance == | == Maintenance == | ||
Revision as of 19:56, 22 June 2020
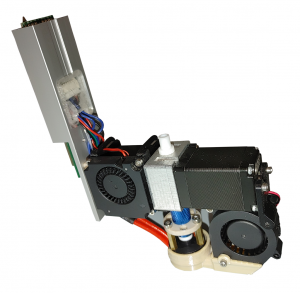
The MK2-250 is specially designed for flexible filaments, and works with flexible 1.75mm filaments which print at temperatures up to 250°C.
This includes the following materials:
- BendLay
- Flex 45
- MoldLay
- Ninjaflex
- EcoFlex PLA
- PlastInk_Rubber
Videos
- General MK Series Videos:
- MK2-250 Extruder for Flexible Filament Videos:
Description
- The MK2-250 is fed filament from the top, through low friction tubing (2mm ID, 4mm OD) seated into a 4mm pneumatic fitting.
- Below the fitting, filament is routed into a PTFE guide tube, which leads the filament between two counter-rotating motor shafts, precisely spaced for flexible 1.75mm filament, giving precise positioning, advance and retract control; the guide tube continues to the top of the brass nozzle, and mates to it.
- At the nozzle, heat is transferred to the filament, whereupon it is forced out through the brass nozzle. Nozzles are available in 1.0mm, 0.75mm, 0.50mm and 0.35mm sizes, as well as blanks, which you can open up to your own custom diameter.
Loading the Head onto the Printer
As with all Hyrel heads, the following process should be followed:
- Start with a level bed and Repetrel running and connected to the printer.
- Load the gibs on the Head into the gib slots on the Yoke from above and slide the head down into place; the last mm of travel should be done gently, ensuring that the electrical connector seats properly (firmly and completely) into the receiving connector.
- Ensure the LEDs on the print head are flashing - this means the Head is communicating with the Motion Controller.
- Tighten the thumbscrew in the rear, to prevent the head from moving relative to the Yoke.
- If the Head doesn't show up in Repetrel, press and release the RESET button on the front of the printer.
- Once the Head is shown in repetrel, proceed to setting your Z-Zero position.
Loading material into the Head
MK2-250 heads all ship with a remaining piece of filament from the last test print. We recommend leaving a few cm of filament above the head when changing heads.
Unloading:
- With the head properly seated and the emergency stop OUT, warm the head to the service temperature of the presently loaded material.
- If presently loaded to a spool, press down on the blue pneumatic fitting and release the guide tubing; then cut the filament a few cm above the head.
- Press the manual feed lever (at the top left of the head's 103 circuit board) to the left, retracting the filament. Retract until the filament comes free of the motor shaft, then remove.
Loading:
- Straighten (if needed) the last few cm of the new filament, which should be routed through the guide tubing. Insert it down through the pneumatic fitting, into the PTFE guide tube, until it comes in contact with the motor shafts.
- Press the manual feed lever to the right, advancing the filament two to three cm.
- In repetrel, click the motor on at 500 (pulses per second) until the new filament advances to the melting zone and forces the old filament out. Advance about 30cm of filament, checking for smooth sides and uniform color.
- Remove excess filament with tweezers. Seat the guide tubing. You are ready to go.
Default Parameters
Default settings for all MK series heads are shown on the Filaments page.
Adjustments
You will likely have to make changes to the PRIME and UNPRIME settings, depending on how flexible your material is. In dialing in new settings, I usually double or half the settings for both STEPS and TIME, then make another print and reassess. Please check our material guides at http://hyrel3d.com/materials/.
Firmware
With version 4 and later, all heads take the same firmware!
With version 3 and earlier, MK2-250 heads all use the firmware labeled "FILAMENTS_33A.hex" or "hothead.mk400.33A.hex" (these are actually the same file with different names).
Maintenance
Very little maintenance is required on this head. Use a wire brush or tweezers to remove any excess plastic on the nozzle. Flexible filaments do not erode as easily as more rigid filaments.
Changing Nozzles
How to disassemble the nozzle from the MK1 head:
- Carefully:
- Heat to the printing temperature of the material loaded.
- Move the manual lever to the left, retracting material until it is free of the hobbed shaft, then remove by hand.
- Turn off heat to the head and remove it from the yoke.
- With a 1/4" driver or wrench, remove the nozzle.
- . Inspect the nozzle cavity for any stray material; if found, remove with tweezers, solvent, air pressure or other means.
How to reassemble the nozzle on an MK1 head:
- Carefully:
- Ensure your MK1 has no filament loaded.
- With a 1/4" driver or wrench, attach the nozzle.
- Use normal procedure for heating and loading filament.
Please let me know if any of that is not clear.
You really should not have to do this. If you replace our nozzle with some other nozzle, you may have issues, because ours is designed to mate with the guide tubing with no gap.
