Difference between revisions of "RSD"
(Created page with "Category:Hardware Category:Cold_Flow {| align="right" | __TOC__ |} The RSD-30 is a refrigerated (or, technically, heated) version of our SDS-30 extruder for low v...") |
|||
| Line 5: | Line 5: | ||
|} | |} | ||
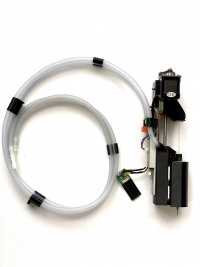
The RSD-30 is a refrigerated (or, technically, heated) version of our [[SDS]]-30 extruder for low viscosity emulsions which print at temperatures down to | The RSD-30 is a refrigerated (or, technically, heated) version of our [[SDS]]-30 extruder for low viscosity emulsions which print at temperatures down to 20°C below ambient. | ||
[[File:RSD-30.jpg|200px|left|RSD-30]] | [[File:RSD-30.jpg|200px|left|RSD-30]] | ||
Latest revision as of 13:49, 26 June 2020
The RSD-30 is a refrigerated (or, technically, heated) version of our SDS-30 extruder for low viscosity emulsions which print at temperatures down to 20°C below ambient.
This includes the following materials:
- Liquids
- Gels
- Emulsions
Videos
- Overview of the head:
- Installing the RSD Head:
Description
The RSD heads accept 30cc BD plastic syringe reservoirs] with luer fittings. Industry standard luer tips or needles are available from a variety of sources.
UV Crosslinking
All of our reservoir-based heads can take a UV Array, mounted around the nozzle, or a UV Pen, mounted in another tool position.
The UV Arrays are lower power, and available in 280, 310, 365, 405, or 450 nm.
The UV Pens are higher power, and available in 365, 405, or 450nm.
Syringes
The RSD-30 takes the 30cc BD model 302832 syringe, available from many sources including McKesson and Vitality Medical.
Loading the Head onto the Printer
As with all Hyrel heads, the following process should be followed:
- Start with a level bed and Repetrel running and connected to the printer.
- Load the gibs on the Head into the gib slots on the Yoke from above and slide the head down into place; the last mm of travel should be done gently, ensuring that the electrical connector seats properly (firmly and completely) into the receiving connector.
- Ensure the LEDs on the print head are flashing - this means the Head is communicating with the Motion Controller.
- Tighten the thumbscrew in the rear, to prevent the head from moving relative to the Yoke.
- If the Head doesn't show up in Repetrel, press and release the RESET button on the front of the printer.
- Once the Head is shown in repetrel, proceed to setting your Z-Zero position.
With the RSD head, you must provide a cold (or hot) water source; please see the video at https://www.youtube.com/watch?v=dgfeoLZNW6c
Loading material into the Head
Loading:
- Care should be taken to avoid air pockets, as this will introduce delay when starting and stopping material flow.
- The plunger adapter will need to be adjusted up or down to match the position of the plunger for the amount of material you have loaded; do this with the manual feed lever at the top left of the 103 hothead controller board. See videos, above.
Unloading:
- Unloading is the same process as loading, only in reverse. Tubes and nozzles should be cleaned thoroughly after use.
Default Parameters
Default settings for all SDS series heads are shown on the Cold_and_Warm_Flow page.
Adjustments
The only adjustments needed should be changes to the PRIME and UNPRIME settings, and will have to be dialed in based on how viscous and compressible your material is, and how narrow a nozzle or luer tip you are using.. In dialing in new settings, I usually double or half the settings for both STEPS and TIME, then make another print and reassess.
Firmware
Please see the Downloads page for the current firmware for your heads and your version of Repetrel.
Note that the default for version 3 is _TUBES_35K.hex for standard use, or _TUBES_49V.hex with the Clench Valve. On version 4 and later, ALL heads take the same firmware.
Maintenance
With disposable syringes and luer tips to prevent cross-contamination, very little maintenance is required on these heads. Ensure that your temperature control reservoir and supply are kept clean.
