Difference between revisions of "TAM"
(Created page with "Category:Hardware Category:Warm_Flow {| align="right" | __TOC__ |} The TAM is our 15cc print head for high viscosity emulsions which print at up to 270°C, with our i...") |
|||
| Line 48: | Line 48: | ||
== Default Parameters == | == Default Parameters == | ||
Default settings for the | Default settings for the TAM are shown on the [[Cold_and_Warm_Flow]] page. | ||
== Adjustments == | == Adjustments == | ||
Revision as of 20:50, 22 June 2020
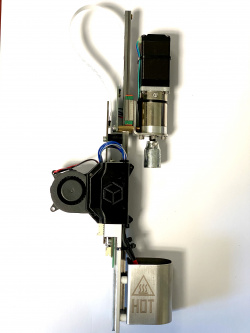
The TAM is our 15cc print head for high viscosity emulsions which print at up to 270°C, with our improved reservoir/plunger system. This head may be used in conjunction with a UV Array mounted around the nozzle or a UV Pen.
This includes the following materials:
- Emulsions
- Resins
- Hot Glues, including 3M 3796
Additionally, the TAM's temperature range allows it to function as an EMO, a VOL, or a KRA.
Description
The improved reservoir/plunger system consists of a custom machined reservoir, a dual-gasketed plunger, and a ball screw in place of the threaded rod. These improvements were made to surmount the issue of high temperature, high viscosity material leaking past the single gasket of the KRA; most users will not encounter this situation. As an option to reduce wasted volume, a conical plunger is available.
Loading the Head onto the Printer
As with all Hyrel heads, the following process should be followed:
- Start with a level bed and Repetrel running and connected to the printer.
- Load the gibs on the Head into the gib slots on the Yoke from above and slide the head down into place; the last mm of travel should be done gently, ensuring that the electrical connector seats properly (firmly and completely) into the receiving connector.
- Ensure the LEDs on the print head are flashing - this means the Head is communicating with the Motion Controller.
- Tighten the thumbscrew in the rear, to prevent the head from moving relative to the Yoke.
- If the Head doesn't show up in Repetrel, press and release the RESET button on the front of the printer.
- Once the Head is shown in repetrel, proceed to setting your Z-Zero position.
Loading material into the Head
Loading:
- Care should be taken to avoid air pockets, as this will introduce delay when starting and stopping material flow.
Unloading:
- Unloading is the same process as loading, only in reverse. Tubes and nozzles should be cleaned thoroughly after use.
Default Parameters
Default settings for the TAM are shown on the Cold_and_Warm_Flow page.
Adjustments
The only adjustments needed should be changes to the PRIME and UNPRIME settings, and will have to be dialed in based on how viscous and compressible your material is, and how narrow a nozzle or luer tip you are using.. In dialing in new settings, I usually double or half the settings for both STEPS and TIME, then make another print and reassess.
Firmware
Please see the Downloads page for the current firmware for your heads and your version of Repetrel.
Maintenance
While cleaning your print media from the tube and nozzle after every print is important, very little other maintenance is required on this head.

