How do I...
How do I adjust the settings?
This is pretty easy, once you know the flow.
- You set the recipes for the parameters (extrusion width, infill patterns/density, print speed, layer thickness, head/bed temperatures, etc.; save the recipes (with descriptive names - don't overwrite the originals), and close the recipe editor.
- You highlight your properly scaled, positioned, rotated stl and select the print, printer, and extruder (filament) recipes to use, and go to Process > Slice with Slic3r.
- You review your gcode to ensure that you got what you were hoping to get; review the layer-by-layer rendering as well as the actual settings for temperature, layer thickness (Z moves and M756 flow settings), etc.
- You load the print head. Default settings from the head are displayed in Repetrel.
- You ensure that the data on the print head reflect your preheat temperature (if any) and proper nozzle diameter (and prime/unprime settings if your custom material requires adjustment) - these settings should be flashed to the head.
- You do any preparation (preheating, bed treatment, priming material, etc).
- You press Print. Upon pressing print, the following happens:
- Head settings are sent from repetrel to the printer.
- Gcode is sent from repetrel to the printer. Since gcode is sent second, this will overwrite any head-based settings if gcode has different values
How do I change or clean nozzles?
Carefully:
- Heat to the printing temperature of the material loaded.
- Move the manual lever to the left, retracting material until it is free of the hobbed shaft, then remove by hand.
- Turn off heat to the head and remove it from the yoke.
- With a 1/4" driver or wrench, remove the nozzle.
- Inspect the nozzle cavity for any stray material; if found, remove with tweezers, solvent, air pressure or other means.
- The old nozzle can be cleaned with a fine drill bit the same size as (or slightly smaller than) the nozzle diameter; some users also soak the nozzle in an appropriate solvent to remove all material.
- With a 1/4" driver or wrench, attach the new nozzle.
- Use normal procedure for heating and loading filament.
How do I change nozzle sizes?
There are two places where we consider nozzle size:
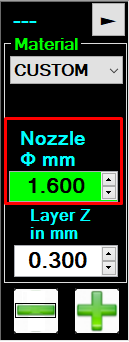
1. On the head, we use the number you have for nozzle diameter to make our flow calculations. See Flow Rate for details about how we determine how fast to spin the motor so that you get the proper volume per second of deposition. This image is for printing with a 14# (fourteen gauge, or 1.6mm ID) luer needle:
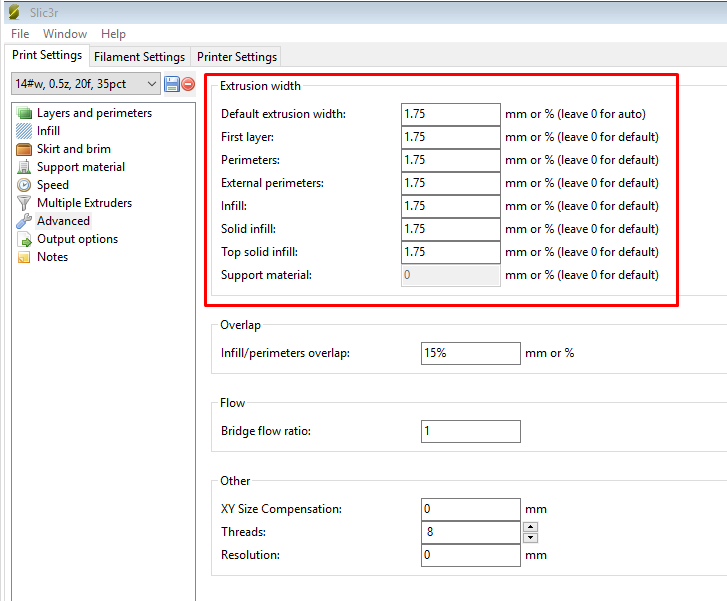
2. In the recipe, we use the extrusion width numbers to determine how far apart to place each bead of material. We expect your extrusion width to be 10% wider than your nozzle diameter (to allow for a nice sandbag-shaped cross section). This image is for printing with a 14# (fourteen gauge, or 1.6mm ID) luer needle:
This applies to everything we print, from PLA to Porcelain to PEEK.
Please note that we do NOT use any other variable relating to nozzle diameter. Not Bridge Flow Ratio. Not Nozzle Diameter. Not Extrusion Multiplier. All of these variables affect the E values in your gcode. Which we then ignore.
How do I convert DXF files to gcode?
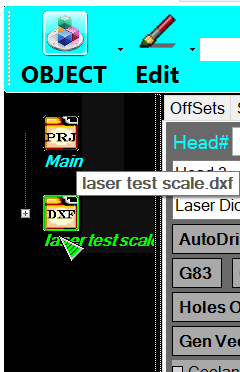
1. In Project Composer, open your DXF:
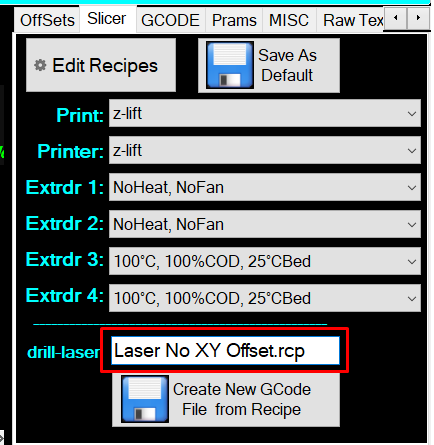
2. On the Slicer tab, double click in the text box next to drill-laser, and select the recipe:
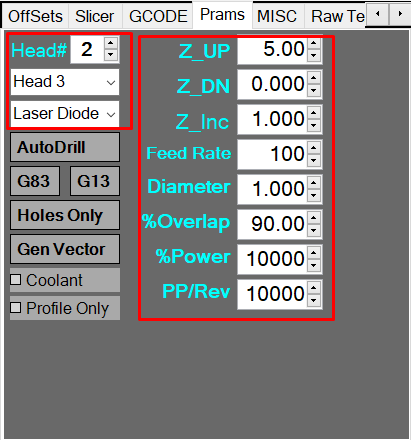
3. On the Prams tab, configure the head and settings to use:
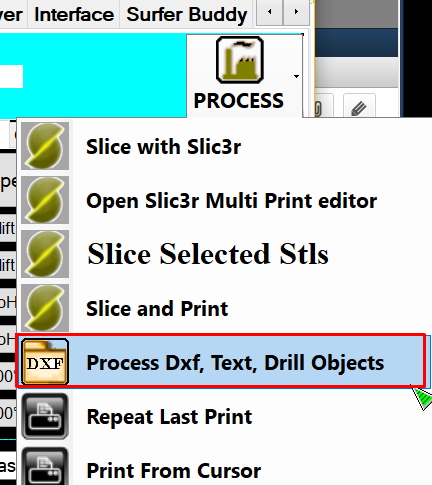
4. Process > Process DXF, Text, Drill Objects:
5. Profit!
How do I hand-code a test pattern?
This is not as hard as it seems - provided we start with basic understanding of how the printer operates. This gcode is for printers OTHER THAN the EHR, and for emulsion-based printing WITHOUT opting in to use E values with M229.
1. Before starting, we always want to do some things explicitly, regardless of what model:
M107          ; fans/UV     ; off
M106 C255     ; fans/UV     ; use 0-255 range
G53           ; clear offsets
G21           ; units       ; mm
G90           ; coordinates ; absolute
2. Before moving, we want to drop the bed for safety, and then home the X/Y:
Note: EHR users use different code here.
G91             ; coordinates   ; relative (because we don't want to go to Z10, but Z 10 away from current position)
G0 Z10          ; drop bed 10mm
G92             ; coordinates   ; absolute
G28 X0 Y0       ; home          ; X and Y
3. Next, we want to take care of any temperature settings. M104/140 just set the temps for head/bed; M109/M190 set AND WAIT for these temps:
M190 S80        ; bed temp      ; set and wait
M109 T12 S240   ; head temp     ; set and wait  ; second slot from left (TXX for tool VARIABLES)
4. Finally, we want to assign which head will do the printing:
T1 ; active head ; second slot from left (TX for tool COMMANDS)
5. Now, let's code a move to the start point. G0 is for "rapid" non-working (non-printing) moves:
G0 Z0.5         ; rapid move to put the head 0.5 mm above the build surface (assuming you have already set the Z-zero)
G0 X50 Y25      ; rapid move to put the head/bed positioning at X 50, Y 25, our starting point for this line
G1 X50 Y175 E1  ; extrusion move to the end point - in this case, moving in the Y axis only
G1 X60 Y175     ; extrusion-speed move (without extrusion) to start of next line - No E value means no extrusion
G1 X60 Y25 E1   ; extrusion move to the next end-point
6. Easy enough, so now let's double the flow rate and increase the print temperature (and pause for the temp to change) for the next line:
M221 T12 S2     ; flow rate     ; multiplier x2 (S2)
M109 T12 S250   ; head temp     ; set and wait, second slot from left
G1 X70 Y25      ; extrusion-speed move (without extrusion) to start of next line
G1 X70 Y175 E1   ; extrusion move to the next end-point
Always refer to the correct chart for your T commands and T variables!
How do I understand these v4 errors?
So, if your gcode is just for one head, which isn't specified, and you only have one head loaded, Repetrel always has and will still print with that head (you just need to acknowledge the warnings first).
Our newer recipes, available from Slicing, includes these commands for single-head prints. If you have moved into multi-head prints and need assistance in specifying this info, please contact Davo for some instruction.
Missing Tx Argument
However, not coding the tool to be used is unacceptable in the CNC world, and we want people to get used to coding in their tool assignments. And yes, it should say Tx command, not Tx argument.
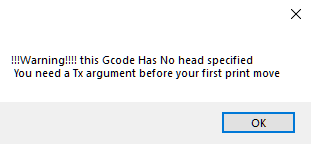
As detailed at the very top of the Gcode Page, you should use a T# command, where # is the slot of the tool you will use, starting with T0 for the left most slot, T1 for the second from the left, etc. Failure to do this will pop up this warning:
This is non-fatal; you can just hit enter or click "OK" and continue, but we want to encourage you to specify which tool to use.
Heads Not Installed
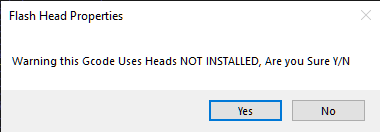
So, you've bypassed (or didn't get) that first error, and now you get another error:
This means that when your file was loaded, it was scanned for any Tx commands - but when you pressed print, the tool positions occupied on the printer don't match the tool assignments in the gcode. Again, this is non-fatal, and if you know your setup is correct, you can hit enter or click "Yes". But, again, we want you to know that the configuration detected on the printer does not match the configuration specified in the gcode.
But It Matches!
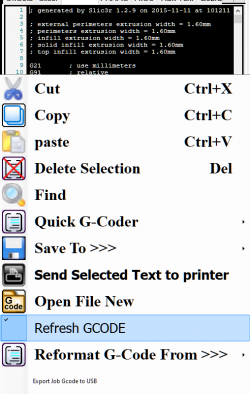
So, perhaps you've gotten these errors, and then edited your gcode file to specify T1, which matches the slot where your head is loaded. Well, we don't scan the gcode a second time 'unless your right-click in the gcode and select "refresh gcode"' - doing this will eliminate getting this message after you have edited in the assignment:
How do I know which T parameter to use?
Awesome question. We know it can be confusing, and that's why we have pages explaining just that!
For Repetrel version 4 and earlier, please see T v4.
For Repetrel version 5 and later, please see T v5, where we've simplified this!
My "New" machine just lost one of its axes or heads!
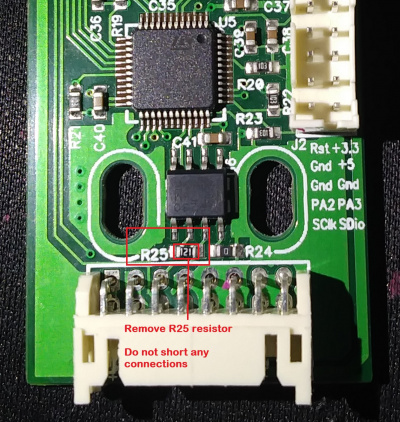
With the new CANBUS-controlled motors, it turns out we have a little bit too much termination, and if you're using multiple heads you will have to remove the R25 CANBUS termination resistor from one (or, better yet, all) of the heads. This is easy - just hit it with a hot soldering iron and it should pop off. Click image for larger version.
How should I understand that E Value?
For most printers, the number after the E means how much material to Extrude.
On our printers, if you are on v4 and you use the M229 E1 D1 command (explained on the Gcode page, click on Controlling Material Flow and then on M229), then this E number, generated by the slicer, is how much VOLUME of material to extrude during each G1 move that has an E value.
Also on our printers, if you are on v3 or earlier, or if you are on v4 and you do NOT specify M229 E1 D1, then we will use the presence of an E value simply to determine if this move should have material extruded or not; then we will calculate what rate to extrude at based on your nozzle diameter, layer thickness, and F value (movement speed in mm/min). This is explained on the Flow Rate page.
I personally recommend USING the M229 E1 D1 if you are printing with thermoplastics, as some slicers adjust this E value for thicker lines (or layers).
I personally recommend NOT USING the M229 E1 D1 if you are printing with liquids, gels, or clays, as these shapes very rarely have overhangs or bridges.
How do I create or import the files for the part I want?
You can create your stl file with most of the popular cad packages, such as SolidWorks, AutoCad, Alibre, FreeCad, Google SketchUp, ProE, TurboCad, etc.
We bring the .stl file into MeshLab to heal the file (remove reference lines, resolve duplicate vertices, etc.).
Then we bring the healed .stl file into Slic3r to slice it (convert it into the G-code that drives the printer). We will provide typical Slic3r recipes (temperature, flow rate, movement speed, layer thickness, etc.) for filaments and extrudables.
Then we use our very customized version of Repitier Host, which drives the printer to create your part using the G-code from Slic3r.
Why does my motor grind on the filament?
Standard causes and solutions for the motor grinding on the filament (and not advancing it as rapidly as needed):
| Possible Cause | Suggested Fix |
|---|---|
| Friction or resistance on the delivery path before the motor shaft, including things like: | |
| tangled spool kinked filament sharp entrance angle where filament enters guide tubing kinked tubing. |
untangle unkink make gentler angle unkink |
| Friction or resistance on the exit path after the motor shaft, including things like: | |
| Filament not fully melting fast enough for the demanded throughput. Nozzle too narrow for the demanded throughput. Nozzle too close to build surface, causing back pressure. |
Try higher temperature, thinner layers, and/or slower print speed. Try extra torque head, or suggestions above. Reestablish Z-zero positioning. |
| Buildup on drive shaft hobs (teeth). | Use vacuum or air pressure to clean out the hobs for optimal filament engagement and drive. |
What Maintenance Should I Do?
The majority of our motion bearings come from PMI, and here are their recommendations: http://www.pmi-amt.com/en/products/amt_options.htm
You can use a grease or an appropriate liquid oil. You can buy the manufacturer's oil applicator, but other machine oils such as "sewing machine oil" should be fine.
Oil is definitely the simplest. Just spread a few drops on the rail after wiping off all debris.
Other than cleanliness (and a low-humidity environment), no other maintenance is required unless some problem arises.
How do I slice for 4th- or 4th-and-5th-axis machining?
We normally do it by hand, but we also recommend SimplyCAD, which his free.
Why doesn't one tool position work?
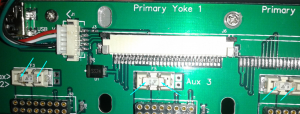
If you have one slote (or more) in which no heads heat up or advance material, but these heads work on other slots, you've probably blown one fuse (or more). These are easy to replace:
You'll need to ensure that this is the problem:
- Power down.
- Remove the silver Phillips screws so that you can lift the upper yoke board up and pull it back, out of the way.
- Check for resistance from one side of each fuse to the other (see blue arrows). Any fuse with 0 Ohms is good, but anything greater is blown.
New Style
From around 2016 on, we've been using fuse holders, which allow easy replacement:
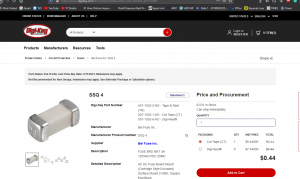
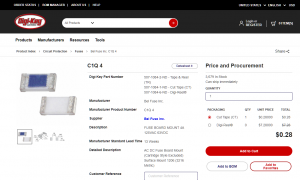
These can be reordered from Digi-Key, or directly through us.
Old Style
Units from before 2016 may have fuses soldered in place:
These can be reordered from 4/507-1084-1-ND/615045 Digi-Key, or directly through us.
Replace the Fuse
Replace the old, blown fuse with a new one (you may opt for a larger fuse, but only 15 amps maximum is sent to the yoke) by either simply swapping them out (new ones) or using a soldering iron to remove the old and attach the new (older ones).
Power up and test!
What's that Clicking?
When you hear clicking from a filament head, and material isn't coming out properly, it means that the head cannot advance the material as fast as the gcode demands. Possible causes and solutions:
Mechanical or Logical?
Question: Is this a problem with throughput in general, or with this print in particular?
Investigation: Position the head above the bed (in mid air) and at print temp (240°C for ABS, 210°C for PLA, etc.); attempt to manually advance material at 500 pulses/second (500 on the screen).
Answer 1: If this does not work, you have some mechanical issue - go to Case 1: Mechanical.
Answer 2: If this works, your head is functioning normally, but we'll need to adjust your parameters - go to Case 2: Logical.
Answer 3: If you cannot bring the head to the proper temperature for printing, we have a heating issue - go to Case 3: Heating.
Case 1: Mechanical
Most Common Cause: Input Problems.
Most Common Solution: Find and remove cause of input restriction. Please ensure that there is smooth, low-friction delivery from the spool, through the pneumatic fitting on the chassis, through the PTFE tubing, through the pneumatic fitting on the head, and into the Feed Chamber on the head. There should be no bends or kinks or sharp angles, and no dragging across sharp surfaces. Filament should inter interior PTFE shaft after passing the drive shaft, centered on the hobs (gearing) and pressed firmly (but not too tightly) by two bearings separated by a washer. If you've disassembled and reassembled this part, ensure that this bearing rod is not flipped.
Less Common Cause: Output Problems.
Less Common Solution: Find and remove the cause of the output restriction. While rare (we do test prints with every head and every printer before shipping them), it's possible that some foreign material made its way into the fusion chamber or melting zone of the nozzle. Please follow instructions above for changing and cleaning nozzles, but replace the same nozzle.
Case 2: Logical
Most Common Cause: Temperature is too low for this combination of Material, Layer Thickness, and/or Print Speed.
Resolution: Use a higher temperature and/or thinner layers and/or slower print speeds.
Less Common Cause: If on first layer, perhaps Z-zero is wrong and nozzle is too close to build surface.
Resolution: Ensure bed is level; recalibrate Z-zero.
Case 3: Heating
If the head is not reaching temperature, or not maintaining temperature, we need to find out why:
Is the head set to the right temperature? Just look at the GUI to tell. If it cannot be set to the right temperature, some settings are wrong. Please contact me, hyrel3d@gmail.com or 404-914-1748.
Does the head reach the right temperature? Again, check the GUI. If the head is set properly, but does not warm up, we'll need to check to see if it's getting 12VDC. Please contact me, hyrel3d@gmail.com or 404-914-1748.
Does the head stay at the right temperature? Right, GUI again. If the head is set to temp, but later becomes set to a lower temp (or turned off), I'll need to examine your settings and gcode. Please contact me, hyrel3d@gmail.com or 404-914-1748.
What's the Reset Button?
The Reset button will clear and reestablish communications between the motion controller (the STM407 on the ESR and 30M, or the STM429 on the EHR and Hydra). This doesn't necessarily happen with a reboot, so sometimes we want to be sure it happens; but it's not a panic button, and you shouldn't press it if you don't need to. It's a small button on the motion controller, but we configure another button as well.
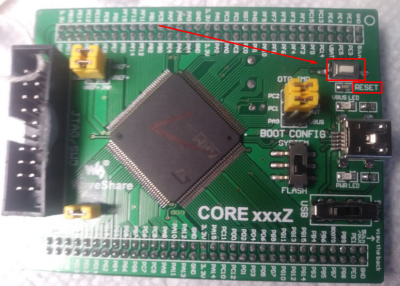
The internal button looks like this on the 407 (ESR, 30M):
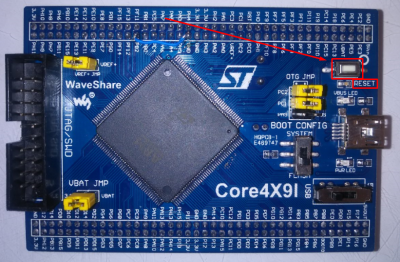
The internal button looks like this on the 429 (EHR, Hydra):
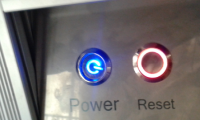
The external button on the 30M is on the front panel, and looks like this:
The external button on the ESR and EHR is on the right side and looks like this; earlier models have a green or red button:
The remote button on the 16A is located inside, behind the control panel, and looks like this:
What About Exhaust?
We recommend at least 500 cfm or 850 m3/h of exhaust while lasering. You will find a 6 " or 150 mm circular exhaust port on the lower left side of the Hydra 16A printers.
Most thermoplastics do better with a heated chamber, so you would not want to vent (or have a very slight negative pressure to minimize escaping fumes) while printing with some materials (every material is different), but you may want to evacuate the air in the chamber after a print has completed. For this reason, an exhaust regulator with variable settings is probably the best solution.
How can I make Spindle Tool Gcode?
We recommend SimplyCAM, a great, inexpensive program from https://www.mr-soft.net/en/scam.html
How should that Microprocessor be Set?
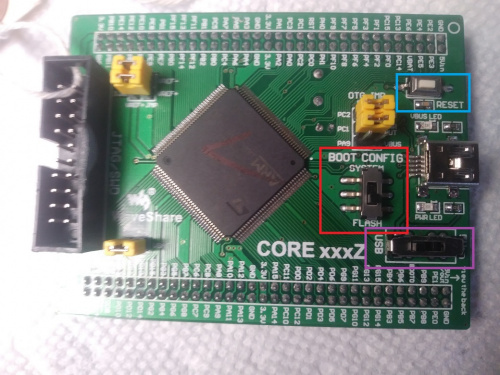
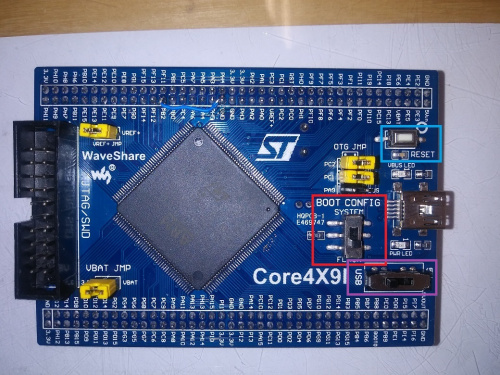
Your motion controller (green STM407 on ESR and 30M printers, or blue STM32 on Hydra and EHR printers) has two switches.
The BOOT CONFIG switch can be set to SYSTEM (usually up or left - sometimes needed for flashing firmware) or FLASH (usually down or right). It should be set to FLASH for normal operations.
The unlabeled power switch can be set to USB (usually left or down - you should not need to use this setting) or 5Vin. It should be set to 5Vin for normal operations.
Note the RESET button, shown here above the USB connector and the LED. You need to RESET after changing any switch positions. All current printers also have a RESET button on the outside or inside of the chassis.
Images:
